Admins can create or edit Email templates to custom-design the look and feel of emails that will be sent to end-users.
Note: It is important to note that there are different types of email template that are used for different situations. See details of the Type dropdown list for more information.
Creating or Editing an Email Template
From the Admin Console's Design > Email Templates page, you can do either of the following:
- Click Add (purple arrow below) to create a new Email Template.
- Click Edit (orange arrow) alongside an existing Email Template to edit it.

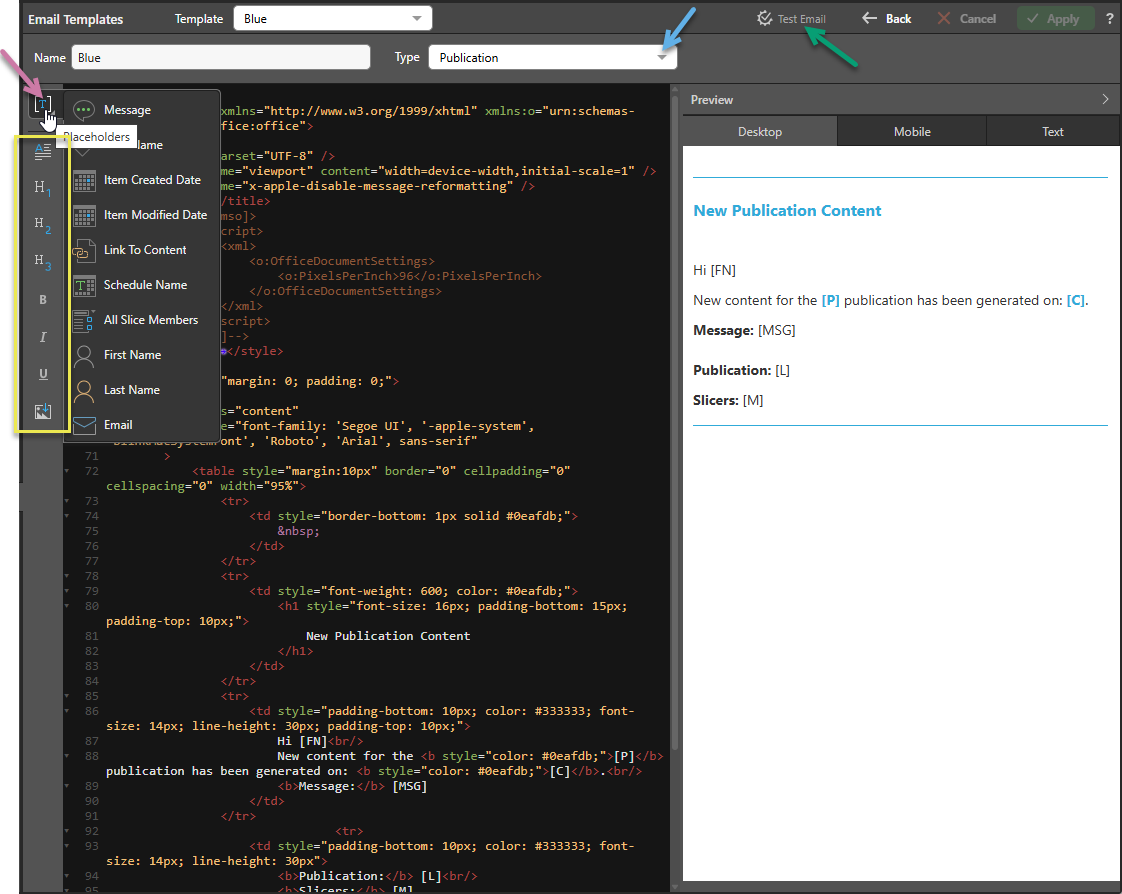
Editor Details
The basic layout of this editor includes a HTML editor to the left and Preview panel (showing how the email will look on a Desktop, Mobile, or as Text) to the right:
Tip: Click the Back button at the top of this page to return to the Email Templates list.
Template Details
- Name: The template name.
- Type: The type of email (blue arrow) the template relates to: Publications, Subscriptions, Alerts, Administrative, Conversation, and Master Flow. There are also options related to the Governed Sharing functionality (see below).
- Secured: New template only. The Secured checkbox and Tenant dropdown list are shown above the canvas when you are creating a new email template.
Governed Sharing Templates
These templates are used to create emails that are sent to either recipients of the share or to the Administrator or Sender as part of the Governed Sharing process:
Recipient Emails
These emails are sent when the artifact is shared:
- Share - Dynamic Content - This type of email is sent to a recipient who is an existing user (that is, who is registered as a user in Pyramid) when they are granted access to an artifact using Share Link.
- Share - Printed Content - This type of email is sent to the recipient when an artifact is sent to them as an email attachment (Send Export).
- Share - Dynamic Content + onboarding - This type of email is sent to a recipient who is an unknown user (that is, a user in the authentication provider who is not registered as a user in the current tenant) when they are granted access to an artifact using a Share Link. This email is different to the Dynamic Content email in that it invites the user to register as a Pyramid User so that they can view the linked artifact (when this user is registered, they are typically assigned a Viewer Seat although that is subject to configuration).
Admin Emails
These emails are sent twice daily - once during working hours and once over night:
- Share - Status for admins - This type of email is sent to the administrator to indicate that there are pending share requests in the system that need to be approved or denied by an administrator.
- Share - Status for users - This type of email is sent to the initiating user (the user who initially shared the artifacts) and lists the current status of their recent share requests.
HTML Editor
The HTML Editor (left-hand panel) is where you edit the code for the email template. You can modify the content as required.
Placeholders
Right-click [T] (purple arrow above) to add placeholders to your message. These placeholders are used to include the item name [P], create date [ICD], and modified date [IMD], link to content [L], schedule name [S], and slice members [M] in the body of the email. Which options are displayed depends on the type of email selected.
Where there is a "message" to incorporate; for example, a table of recent share requests and their statuses in the Share - Status for users template; the Message placeholder is used [MSG].
Formatting options
Using the scripting buttons (yellow highlight) to add paragraphs, headings, font style, and so on to the HTML content.
Preview Panel
The preview panel (right-hand panel) allows you to preview the generated email by clicking the Desktop, Mobile, or Text tabs.
Submit and Save changes
- Click Test (green arrow above) to prompt a test email. The email will be sent to you.
- Click Apply to save your changes.
Related information
Once the email template has been created, it can be selected as the default template for the system by selecting the Default checkbox on the main email templates page. For more information, see Email Templates.
Tip: The newly created template can, alternatively, be selected as the default for a specific tenant from the Edit Tenant page. For more information, see Tenant Management.